Jel is without any doubt one of the best “MPC player” around and his playing technique is awesome.
The song is played completely LIVE, no sequencing!
He uses the Akai MPC2000XL for the “played parts” and the Boss SP-303 for a couple of loops.

Jel is without any doubt one of the best “MPC player” around and his playing technique is awesome.
The song is played completely LIVE, no sequencing!
He uses the Akai MPC2000XL for the “played parts” and the Boss SP-303 for a couple of loops.
How to use MUTE GROUPS, for loops and for ONE SHOT samples.
AKAI MPC500 MUTE GROUP TUTORIAL from Soundsforsamplers on Vimeo.
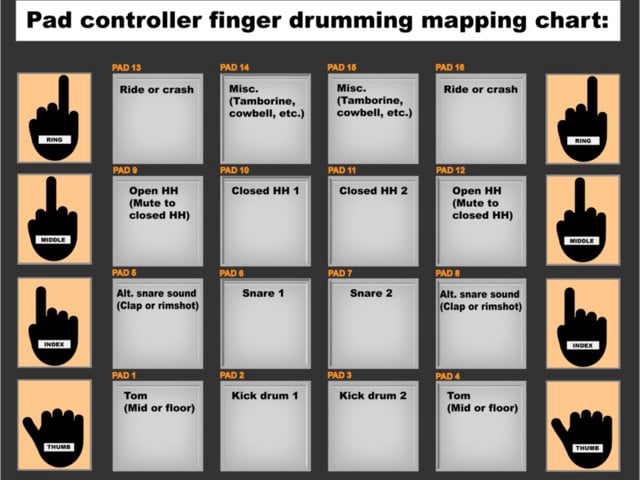
A great video about finger drumming on an Akai MPC 2500.
This technique can be useful with all the MPC models and with pad controllers.
How to do mpc pad finger drumming from Brandon Murphy on Vimeo.
Using the Akai MPC 500 I noticed that the downfall of the “baby-MPC” are :
The first problem , which may seem quite hard to face, for me became not so limiting.
The air-space between the internal of the pad and the sensor is quite far, more than 1,5 mm, so you have to hit hard to make the rubber to touch the sensor.
When you use the machine intensively the rubber of the pad bank tend to behave in a more soft way because of the use , so the pads beaten more often get more “easy to manage” with velocity on and react better to the thump of the fingers.
The second point is the volume.
Reading the manual you can see that the 500 has 12dB less of output volume than the 1000 and 2500, this is quite a lot of volume!
The only way to get it play louder is to use an external preamp or pump up the gain in your mixer.
The problem is caused by the fact that at akai have studied the amp section for a battery powered use, so there are no special settings to get better results.
The one thing to avoid is to pump up the volume of the pads, and get the headroom under -6dB.
Setting the sample volume to 100 will lend for sure to a highly annoing overdive of high frequencies and the total lost of fidelity of the sample played.
My advice is to get the master volume knob to max, headroom to -6dB, and sample volume between 70/90.
In this way you will have a godd result and no overdriven frequencies, then using the gain in your mixer you will get the right volume to fit the 500 in the mix with the other instruments .
The third and quite absurd downfall of the 500 is the strange behaviour of the filters.
I noticed that the LP filter (used as preset in every program) is the main reason that leads to lower volume and distorted sounds.
Sampling a closed hat , the sample sounded good in the “preview” (pushing “play”) while had a different “fidelity and a total loss of high frequencies and a lot of distortion in the program.
Switching the filter from LP(lowpass) to “–” (that means bypass) the sample sounded good again as in the preview.
So the filter was the cause of that awful sound!
I don’t mean that every sample sounds bad with the filter on , but I noticed that quite all the samples gained a little volume and a cleaner definition bypassing the filter, and however some samples sounds very bad with the LP filter on, especially the ones that are rich of high frequencies as hats, cymbals, etc..
The kick is a relly important percussion sound in electronic compositions, let’s get a different way to make it.
Usually to synthetize a good kick we use a sine wave layered with a square, and balance the two if we want a softer kick or if we want more attack.
VCOs tends to be harmonically rich so it’s not simple to get a kick that sounds not clearly tuned.
To get a more “percussive & less harmonic” kick (but it is even useful to create percussions like toms or bongos) I use an LFO.
LFO sounds more clinic, not many harmonic content on the wave generated.
Using a simple SINE wave on the DOEPFER A-145 can lead to interesting kicks and percussion.
The path is really simple A145->A132-3 (vca) and an env to control the vca.
The A145 is interesting as a sound source because it can work very well into audio frequencies, the only downfal is the fact that it has no freq. modulation capabilities.
Using the LIVEWIRE VULCAN MODULATOR we can go further into sound design as the vulcan has cv inputs for the frequency mod.
Using the same signal configuration we can notice that the vulcan sounds more organic, the wave is not a perfect sine, it has some fluctuation too.
The result is a percussion that is not rounded as the 145 but with more punch and more attack.
Actually most of the production process is done In The Box, only with softwares in the computer.
This is considered now a standard because of a total recall of the project settings, no loss of audio quality duing converions and more funtionality within the virtual intruments.
I totally agree with this modus operandi, and I too use a ITB approach for most of the production process, but I think that a little interaction between the “standards” and somenthing “personal” can make the difference.
A useful tip in my making music process is to treat the drum sounds Out Of The Box, usually using old hardware samplers.
In hip hop or r’n’b, even today, there’s a hard culture on old samplers, together with the vinyls and turntables they are seen as the “instruments” to have that phat beatz.
Paying attenction to the power and details of hip hop and black music, especially from the usa, the fact that the sound is incredibly present and detailed is true, even for the people who don’t like the genre.
The making of this sound is composed by three main points:
The aim of my post is not analizing the hip hop making of but take inspiration from that attitude.
Hi-end outboards are really expensive so I plan only to use old samplers to make an A->B test.
The first thing is to get the good material to sample.
Samples from a library are usually compressed and eqed so they are just perfect to try the sampling process in an easy way.
Using our own sampled or synthetized material can be often more difficult because we have to “preprocess” the sound before sampling.
We can choose between two different tipe of processing:
At the end of the process we have two important conclusion to take care of:
if the sample is a short one shot the hw sampler give a more punchy and personal sound but that can fit really well in every softsampler because the short sample sounds “dry”, if the sampled part is longer, a kick loop for example, the loop will sound more “processed” but also less or more (it depends on the sampler used) “ambiented”.
A famous hip hop statment about the Akai S900 is “everything sampled with the 900 sounds like old vinyls…”